🧭 Install the official Elasticsearch Spark connector on Dataproc adapting one of the official initialization-actions scripts, then test multiple architectures to index 1 Million vectors in less than 20 minutes
🔗 Repo: elasticsearch-spark-connector

The last adventure with my brother, acciao & salita
✨ Intro Link to heading
“Artificial intelligence is the new electricity”, if this statement is true then vector databases are the batteries, which is why these frameworks are getting so much attention. We will see how to implement a vector database (Elasticsearch) taking full advantage of the elegance of Kubernetes (GKE), and how to ingest large masses of data into it using Spark, in a scalable and robust solution.
🍣 Components Link to heading
The architecture that we want to deploy will have the following structure:
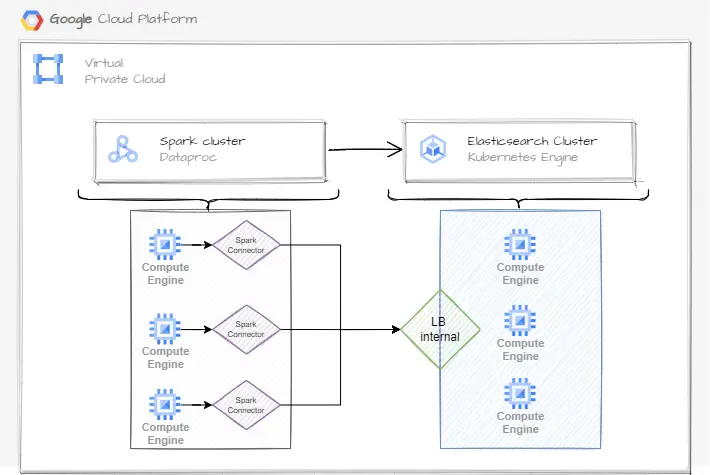
Overview of the interaction between Dataproc and Google Kubernetes Engine
Overview of the interaction between Dataproc and Google Kubernetes Engine
We will see the details, but the key information here is that Dataproc is a cluster composed of multiple nodes, each node will use a technology named Spark Connector to communicate with the Elasticsearch cluster, which is hosted on a Kubernetes cluster (GKE).
Dataproc Link to heading
Dataproc is the Google Cloud Platform (GCP) main service to deploy a Spark cluster. Like other Cloud Services, it takes the responsibility to deploy and manage the Hardware infrastructure.
The Dataproc cluster we are setting up will consist of one master node, which is in charge of running the Spark application and assigning tasks to multiple worker nodes for execution.
So the first issue we will face is about how to set up those nodes (both master and workers) and provide all the dependencies we need: spanning from PyPI dependencies, custom (and maybe private) Git repositories, Spark configurations, cluster monitors, etc.
GCP Dataproc allows us to run custom bash scripts at startup time on each node, using this property we can set up and install all the dependencies we need to shape the cluster with the desired form. Google provides a list of useful scripts to set up common resources: https://github.com/GoogleCloudDataproc/initialization-actions
Elasticsearch Link to heading
Elasticsearch is a powerful and search-oriented NoSQL database, with high horizontal scaling capabilities. It could be used for different purposes, from logs management to documental search, and thanks to the updates released this year it can be used also for vector search, a central requirement for a lot of Machine Learning applications.
Spark Connector Link to heading
By default Spark has some default DataFrame interfaces to interact between various data sources, however, for connecting different technologies to Spark, the custom and ad-hoc interface must be configured to extend the default capabilities.
In this use case, we want to connect Elasticsearch with Spark, and with a simple Google search, we found that there is an official Elasticsearch connector that we can use.
We will see how to configure and use it, but here it’s important to underline that its usage is highly recommended because its capabilities are not limited to “simply connect” Spark to Elasticsearch, but also include features like Elastic Data Discovery, Retry System, Includes/Exclude fields, Scroll KeepAlive and so on, see the configuration list to get a feel.
🏗️ Deploy Link to heading
Elasticsearch Cluster Link to heading
We need a cluster running Elasticsearch with at least the 8.0 version because we will need the KNN functionalities. How to deploy this framework is out of this guide and could depend on the specific needs, sparring from an Elasticsearch cluster completely managed to the custom deployment using custom Kubernetes operators or using native Kubernetes descriptors.
The Elasticsearch architecture used for this guide has the following structure:
- Elasticsearch 8.5 deployed on Google Cloud Kubernetes (GKE)
- Hardware of the node pool:
- 4 VM, 4 cores, 16GB RAM, 100 GB HDD
- We will use one VM for each ES node
- Elasticsearch:
- 1 dedicated master node
- 3 data nodes
- ES privately deployed: the ES service is exposed only internally to our us network
- We also provide one ClusterIP for each ES node, forwarding the traffic on port 9300, this configuration is required for the ES intra-node communication, see the architectures below
Elasticsearch Index Link to heading
After the cluster creation, we need to define the index structure that will be used for indexing and searching the vectors, here is the Kibana code that could be used to create this index:
PUT test-index-768
{
  "settings": {
    "number_of_replicas": 0,
    "number_of_shards": 3
  },
  "mappings": {
    "dynamic": "false",
    "_source": {
      "excludes": [
        "embedding"
      ]
    },
    "properties": {
      "embedding": {
        "type": "dense_vector",
        "dims": 768,
        "index": true,
        "similarity": "dot_product"
      }
    }
  }
}
Let’s see some interesting details about the Elasticsearch index settings we are using:
"number_of_replicas": 0,- disabling replicas suggested to increase performances during indexing, remember to re-enable the replicas after the process to acquire redundancy"number_of_shards": 3- in this architecture we have 3 data nodes, using the same number as shard size allows us to spread one shard for each node and ensure parallelism, note that for a production environment choose the number of primary shards is something that involves other important aspects"dynamic": "false",- with this flag only the fields described on the index could be used, this enforcement ensures that if we have some error on the indexing process (e.g. a misspelling) the ES system raises an error"_source": { "excludes": [ "embedding"- we don’t store the original vector values inside the index, this reduces the size of the index but will be not possible to use the index to retrieve the original vectors (e.g. for a reindexing process)"properties": { "embedding": { "type": "dense_vector"- we will store the vectors available for an Approximate KNN search inside a field named “embedding”"properties": { "embedding": { "dims": 768,- the vectors must be of 768 dimension"properties": { "embedding": { "similarity": "dot_product"- we will use normalized vectors for better search performances
Elasticsearch exposition - architecture 1 Link to heading
We will test multiple Elasticsearch exposition architectures, here the first based on a common Load Balancer that routes the traffic among the ES data nodes.
Exposition:
- For the internal exposition, we use the GKE internal Load Balancer that routes the traffic only to the ES data nodes
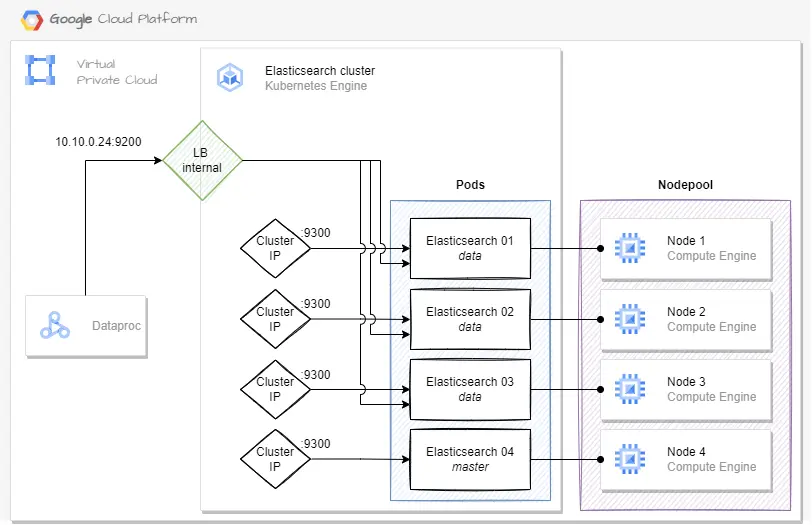
Elasticsearch deployed on Google Kubernetes Engine: architecture 1
Elasticsearch - exposition architecture 2 Link to heading
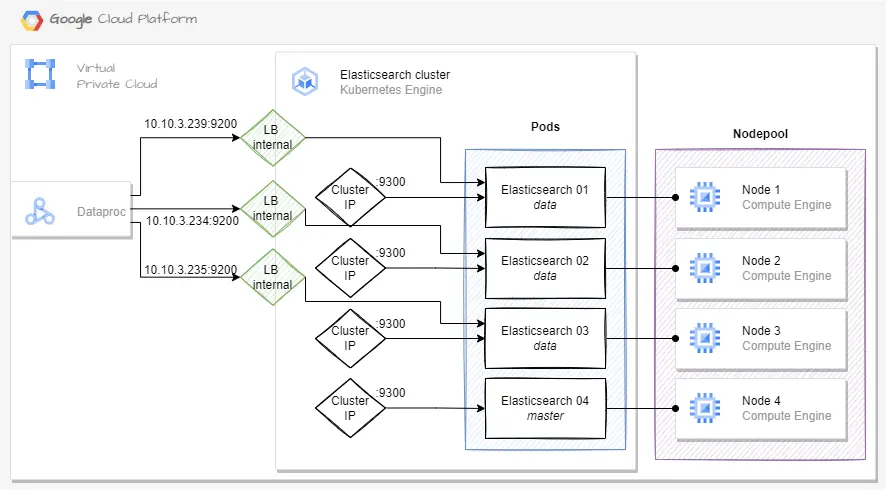
Elasticsearch deployed on Google Kubernetes Engine: architecture 2
The second architecture that allows the Dataproc service to query each node.
Exposition:
- For the internal exposition, we use the GKE internal Load Balancer that assigns an internal IP to each data node, on the 9200 port
Spark Connector Link to heading
To establish the connection between Spark and Elasticsearch we need a Elasticsearch Spark connector. First, we need to choose the correct connector, download it, and then store this connector on GCS because Dataproc will use it.
The information required to choose the correct connector is as follows:
- The Elasticsearch version installed on the ES cluster
- The Spark version installed on Dataproc
- The Scala version installed on Dataproc
For this guide we will deploy Dataproc 2.1.x, from that link we found that the spark version installed is 3.3.2 and Scala 2.12.18, while the ES version we have deployed above is 8.5.0. From the official ES MVN repository we need to look into the Elasticsearch Spark (for Spark 3.X) repository, and then download the JAR on row 8.5.X (ES version) and Scala 2.12.

Screen
The JAR downloaded is named elasticsearch-spark-30_2.12-8.5.0.jar, this is a naming convention that uses the following structure: |——name——||—spark version (3.0)-—||—-scala version (2.12)—||—-es version (8.5.0)--|
Because we need to provide this JAR to the Dataproc cluster, we upload it to GCS on a bucket that we will use later:
LOCAL_JAR=./elasticsearch-spark-30_2.12-8.5.0.jar
GCS_JAR_PATH=gs://mgcp-smartsearch-poc-dataproc/init-scripts/
gsutil cp "$LOCAL_JAR" "$GCS_JAR_PATH"
Dataproc Link to heading
We will deploy a Dataproc cluster having the following features:
- 1 Master node with 2 Data nodes
- The hardware requirements are tailored for a smooth experience, take it in mind that lowering them can make the Dataproc system unstable
- Nodes run the
2.1.30-debian11image, which has installed Spark 3.3.2 and Scala 2.12.18 - With JupyterLab configured to have a notebook experience during the PySpark coding process
- With the installation of the elasticsearch-spark-30_2.13-8.5.0.jar facilitated by the Google init-action that could be found at gs://goog-dataproc-initialization-actions-europe-west1/connectors/connectors.sh, which is designed to install the bigquery-connector but the installation process is, fortunately, the same.
- We only need to manipulate the script by providing the ES jar to the designated variable spark-bigquery-connector-url. The following excerpt illustrates this modification in the gcloud deployment metadata:
-metadata spark-bigquery-connector-url="$GCS_CONNECTOR" \ - Note: for production environments is strongly recommended to copy initialization actions to your own Cloud Storage bucket
- We only need to manipulate the script by providing the ES jar to the designated variable spark-bigquery-connector-url. The following excerpt illustrates this modification in the gcloud deployment metadata:
- Thanks to the init scripts, we can also install the Ganglia monitor system
- The installation is provided by the excerpt
-initialization-actions gs://goog-dataproc-initialization-actions-europe-west1/ganglia/ganglia.sh
- The installation is provided by the excerpt
- So, we can deploy the dataproc cluster using the following code:
SUBNET=mgcp-smartsearch-poc-subnet
REGION=europe-west1
ZONE=europe-west1-b
SA=dataproc-sa@mgcp-smartsearch-poc-230621008.iam.gserviceaccount.com
GCS_CONNECTOR=gs://mgcp-smartsearch-poc-dataproc/init-scripts/elasticsearch-spark-30_2.12-8.5.0.jar
GCS_DATAPROC=mgcp-smartsearch-poc-dataproc
GCP_PROJECT=mgcp-smartsearch-poc-230621008

gcloud dataproc clusters create test-cluster \
        --no-address \
        --subnet "$SUBNET" \
        --region "$REGION" \
        --zone "$ZONE" \
        --enable-component-gateway \
        --master-machine-type e2-standard-8 --master-boot-disk-size 100 \
        --num-workers 2 --worker-machine-type e2-standard-2 --worker-boot-disk-size 100 \
        --image-version 2.1.30-debian11 \
        --optional-components JUPYTER \
        --initialization-actions gs://goog-dataproc-initialization-actions-europe-west1/ganglia/ganglia.sh,gs://goog-dataproc-initialization-actions-europe-west1/connectors/connectors.sh \
        --metadata spark-bigquery-connector-url="$GCS_CONNECTOR" \
        --service-account "$SA" \
        --bucket "$GCS_DATAPROC" \
        --project "$GCP_PROJECT"
- 💡 Tips:
- Is also possible to create a custom script and use it as an initialization action, for example, we can create a script to install custom libraries or clone private Git repositories on each node and use that code inside PySpark functions
- After running those tests, you can delete the Dataproc from CLI:
$ gcloud dataproc clusters delete test-cluster --region europe-west1
🔨 Usage Link to heading
Let’s deep dive inside the Dataproc usage, for first we need to access the Jupyter Lab GUI, from GCP Console open the Dataproc cluster, and click the link JupyterLab under the Web Interfaces tab.
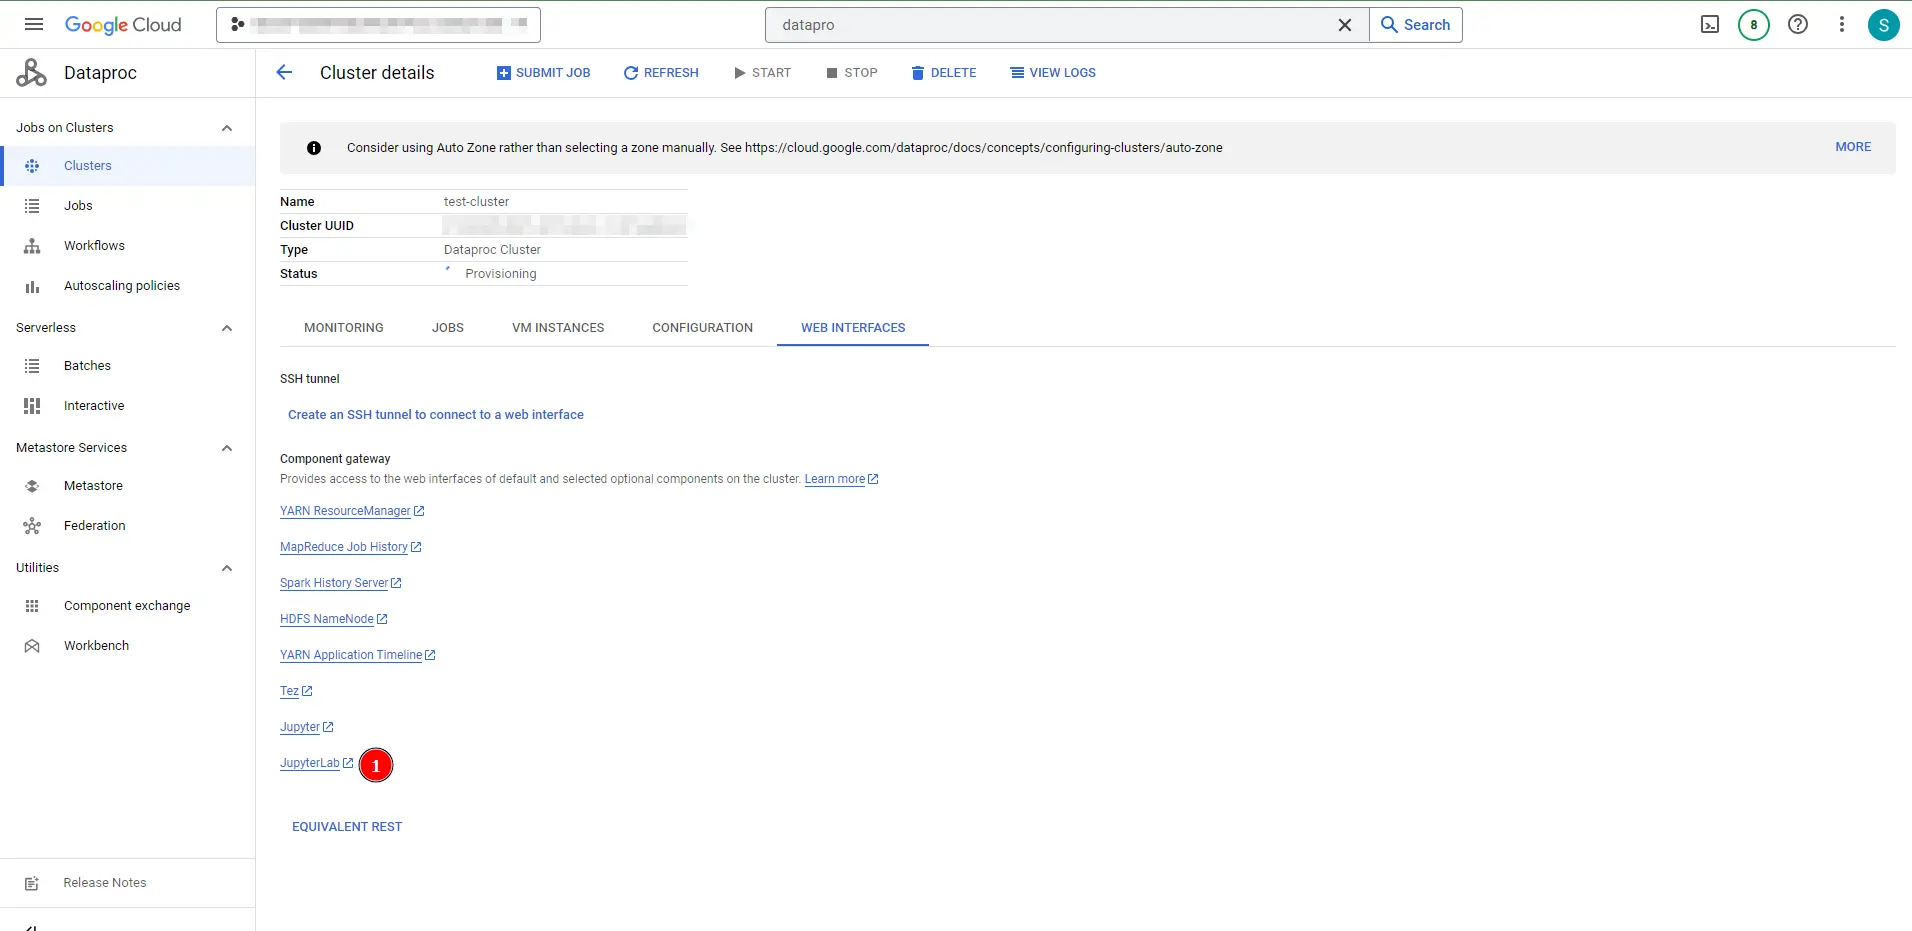
Dataproc Jupyter Lab access link position
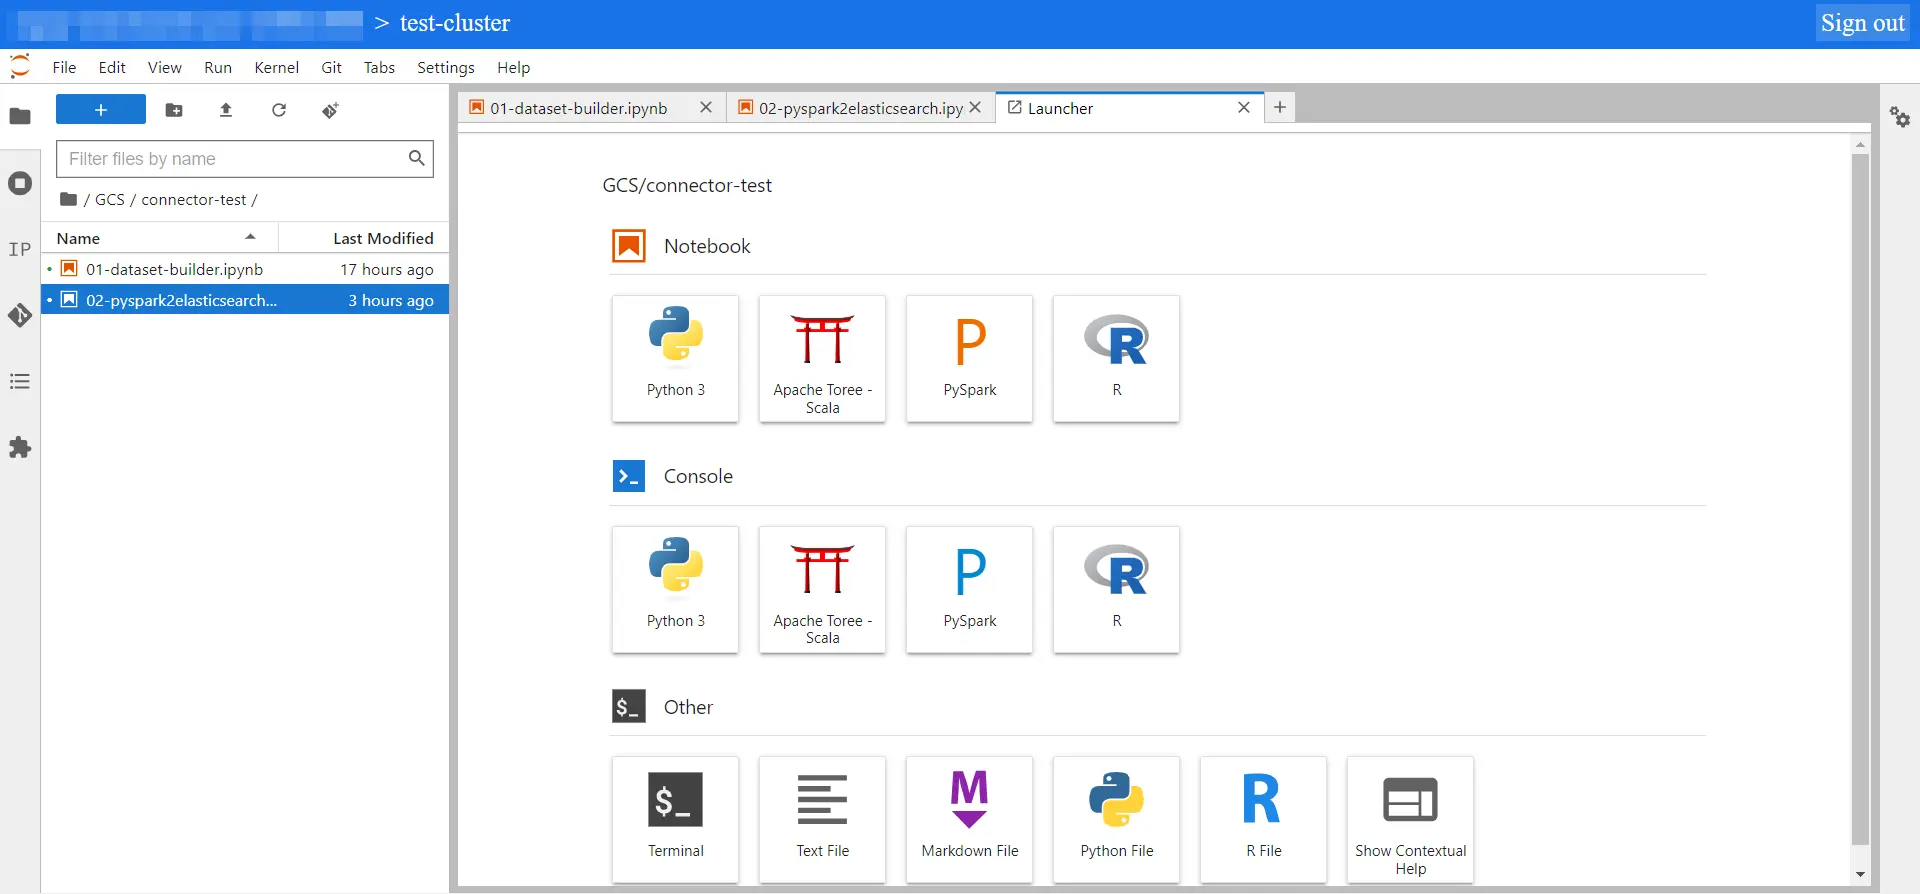
Dataproc Jupyter Lab interface
Now, from the JupyterLab webpage, we can import and run the provided code used to test the ES indexing process.
So let’s see what the codes do:
- File
notebooks/01-dataset-builder.ipynb- Run this notebook before the others, it will generate and store 1 million of random vectors with 768 dimensionality. Those vectors are the dataset that we will use to test the indexing process
- Each vector is normalized
- Replace the values under the “Inputs data” section with values, especially the
EMB_PATHvalue that is the GCS link where the code will store the generated random vectors - 💡 Tips about the code:
- We first create a python list with 1M of rows containing only the row number, those values are under the
emb_idcolumn and will be used as vector unique IDs - Secondly, we create the PySpark dataframe using this python list, and the master will share that object with the workers. This step is not particularly expensive thanks to the light content of the list.
- Then we create a function that will create the random vectors, and thanks to the code
df = df.withColumn("embedding", generate_vector_udf(df["embedding"]))we will scale horizontally this heavy process between Spark nodes
- We first create a python list with 1M of rows containing only the row number, those values are under the
- File
notebooks/02-pyspark2elasticsearch.ipynb- This notebook will load the generated vectors and index them into Elasticsearch using the Spark Connector and the two architectures
- Replace the values under “Inputs data” section with your values, with particular focus on:
EMB_PATH= the same value used for the previous notebookES_INDEX= name of the index created inside ElasticsearchES_HOST= (internal) IP of the LB found in the Elasticsearch exposition - architecture 1 chapterES_HOSTS= (internal) IPs of the LB found in the Elasticsearch - exposition architecture 2 chapter
- This notebook firstly indexes the data using Architecture 1 (one LB that routes through the Data Nodes), then uses Architecture 2 (each Data node is exposed).
- ⚠️ Attention: between the two architecture tests, it is important to reset the Elasticsearch index (delete and recreate it)
- For each indexing process, a timer will be set and used to retrieve the indexing elapsed time for each architecture
- File
kibana/kibana-code.md- Markdown file that contains the Elasticsearch index definition
- File
src/es-index-tester.py- Python script used to make a KNN search to an Elasticsearch index
- We will use this script as a test of the created Elasticsearch indexes
- Remember to install the provided
requirements.txtpackages before run it
📝 Test the KNN search Link to heading
Let’s see the indexing performances of the two architectures running the provided code:
Firstly we see that the data are correctly loaded (code from
02-pyspark2elasticsearch.ipynbnotebook)# Load the data df = spark.read.parquet(EMB_PATH) df.count() # > 1000000 df.printSchema() # > root # |-- emb_id: integer (nullable = true) # |-- embedding: array (nullable = true) # | |-- element: double (containsNull = true)Now that we have the 1M of vectors, let’s ingest it
Performances of Elasticsearch Architecture 1: Link to heading
- The following cell is copied from
02-pyspark2elasticsearch.ipynbnotebook - Some focus from the following code block:
- We see that we are providing the
ES_HOSTparameter as the target node, that is one node IP - We need to set
nodes.wan.onlyandnodes.discoveryto disable the connector functionality of nodes discovery, a useful feature when the Elasticsearch nodes are directly deployed on reachable VMs, but here they are behind a Load Balancer inside a GKE cluster. - We are using
id_esasmapping.idvalue and then we exclude id usingmapping.excludeoption, this combo allows us to useid_esonly as _id field without indexing it inside the mapping
- We see that we are providing the
timer.start()
df.write.format("org.elasticsearch.spark.sql") \
    .option("es.nodes", ES_HOST) \
    .option("es.nodes.wan.only", "true") \
    .option("es.nodes.discovery", "false") \
    .option("es.http.timeout", "5m") \
    .option("es.net.http.auth.user", ES_USER) \
    .option("es.net.http.auth.pass", ES_PSW) \
    .option("es.write.operation", "create") \
    .option("es.resource", ES_INDEX) \
    .option("es.mapping.id", id_es) \
    .option("es.mapping.exclude", id_es) \
    .mode("overwrite") \
    .save()
timer.stop()
timer.print()
# > [Stage 4:=======================================================> (47 + 1) / 48]
#   Time elapsed: 0.00h 24.00m 34.56s
- We see from the code outputs that the indexing of 1M of vectors with 768 dimensionality took ~25 minutes to be completed
- Let’s test the created index:
# Open a connection to Elasticsearch

# Then run the provided script:
$ python src/es-index-tester.py \
						--es_host [http://localhost:9200](http://localhost:9200/) \
						--es_index test-index-768 \
						--es_user my-elastic-user \
						--es_psw my-secret-password \
						--vector_dim 768

# > INFO:elastic_transport.transport:HEAD http://localhost:9200/ [status:200 duration:0.108s]
#            INFO:root:Normalizing the vector...
#            INFO:root:Quering 100 KNN results from test-index-768...
#            INFO:elastic_transport.transport:POST http://localhost:9200/test-index-768/_search [status:200 duration:5.002s]
#            INFO:root:Query completed! Results:{'took': 4947, [...]
Performances of Elasticsearch Architecture 2: Link to heading
- The following cell is copied from
02-pyspark2elasticsearch.ipynbnotebook - Some focus from the following code block:
- The code is similar to the previous test, with some changes to enable the multi-node usage
- Remember to recreate the
ES_INDEXElasticsearch index before running this test - We see that we are providing the
ES_HOSTSparameter as target nodes, that is a list of node’s IP
timer.start()
df.write.format("org.elasticsearch.spark.sql") \
    .option("es.nodes", ES_HOSTS_STR) \
    .option("es.nodes.wan.only", "true") \
    .option("es.nodes.discovery", "false") \
    .option("es.http.timeout", "5m") \
    .option("es.net.http.auth.user", ES_USER) \
    .option("es.net.http.auth.pass", ES_PSW) \
    .option("es.write.operation", "create") \
    .option("es.resource", ES_INDEX) \
    .option("es.mapping.id", id_es) \
    .option("es.mapping.exclude", id_es) \
    .mode("overwrite") \
    .save()
timer.stop()
timer.print()

# > [Stage 4:=======================================================> (47 + 1) / 48]
#   Time elapsed: 0.00h 19.00m 5.57s
- We see from the code outputs that the indexing of 1M of vectors with 768 dimensionality took ~19 minutes to be completed
- Let’s test the created index:
# Open a connection to Elasticsearch

# Then run the provided script:
$ python src/es-index-tester.py \
						--es_host [http://localhost:9200](http://localhost:9200/) \
						--es_index test-index-768 \
						--es_user my-elastic-user \
						--es_psw my-secret-password \
						--vector_dim 768

# > INFO:elastic_transport.transport:HEAD http://localhost:9200/ [status:200 duration:0.108s]
#    INFO:root:Normalizing the vector...
#    INFO:root:Quering 100 KNN results from test-index-768...
#    INFO:elastic_transport.transport:POST http://localhost:9200/test-index-768/_search [status:200 duration:0.089s]
#    INFO:root:Query completed! Results:{'took': 4381, [...]
🚀 Conclusion Link to heading
Indexing 1 million vectors in less than 20 minutes is appealing, and in this article, we saw how to set up the environment to do it.
Although it’s difficult to wrap everything together, this journey scratched the surface of a few big technologies like Spark, Kubernetes, Elasticsearch, GCP, and so on, and I hope that the core values of the article are equally clear and interesting.
In this article, we saw both the “basic” architecture capable of indexing all the data in ~25 minutes, and then the “evolved” architecture that has indexed data in ~19 minutes, so approximately the 24% gain.
⁉️ FAQ Link to heading
Q: Why Elasticsearch?
A: Elasticsearch is (one of) the most important search engines and is widely used in production with profit. Moreover, with the current gold rush to Machine learning and the ChatGPT fever, vector databases with KNN capabilities are also on the top of the hype curve, and Elasticsearch has it and is actively working to improve its usage
Q: Can I use OpenSearch instead of Elasticsearch?
A: I haven’t investigated it but looks like there is this official connector developed for OpenSearch
Q: Why Dataproc?
A: This guide is tailored to the setup of the main product to host Spark clusters in GCP, however, the key points about the connector usage are generic and refer only to the Spark framework.
Q: Can I use Databricks (or whatever Spark runner) instead of Dataproc?
A: Yes, the only difference is to use the official Databricks features (or specific to your runner) to install the Elasticsearch JAR connector
🔗 References Link to heading
- GCP Dataproc - https://cloud.google.com/dataproc?hl=en
- Elasticsearch 8.10 - https://www.elastic.co/guide/en/elasticsearch/reference/current/release-highlights.html
- Spark follow-up contents: